
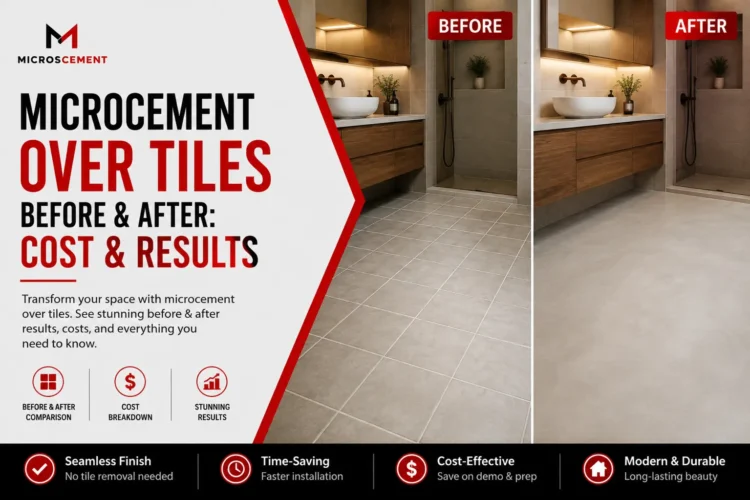
Microcement over tiles before and after shows one of the biggest advantages of this surface system: old tiled floors or walls can often gain a seamless concrete-style finish without removing every tile first. When the existing tiles are stable and properly prepared, microcement can cover grout lines and change the look of bathrooms, showers, kitchens, and floors.
For Dallas homeowners in 2026, this approach can reduce demolition, debris, and disruption. However, the finished result depends heavily on the condition of the existing tiles and the preparation underneath the microcement.
This guide explains the before-and-after results, installation process, costs, suitable surfaces, and problems to check before covering tile.
Can You Put Microcement Over Tiles?
Yes, microcement can be applied over many existing tile surfaces when the tiles are firmly bonded, stable, clean, and correctly prepared. Loose tiles, structural movement, moisture problems, or an unstable substrate should be corrected before installation.
Microcement is a thin decorative coating rather than a thick concrete slab. If you are unfamiliar with the material, this guide explaining what microcement is covers its basic composition, uses, and characteristics.
Suitable surfaces may include:
- Bathroom wall tiles
- Bathroom floor tiles
- Shower wall tiles
- Kitchen backsplash tiles
- Ceramic floor tiles
- Selected porcelain tile surfaces
- Stable tiled feature walls
A professional installer should inspect the tile before deciding whether micro cement over tile is appropriate.
What Does Microcement Over Tiles Look Like Before and After?
Before installation, the surface has visible tiles and grout joints; after installation, it becomes a continuous decorative finish with the tile pattern concealed beneath the coating.
The visual difference can be significant.
| Before Microcement | After Microcement |
| Visible grout lines | Seamless appearance |
| Repeating tile pattern | Continuous surface |
| Older tile colors | Custom modern color |
| Multiple joints | Minimal visual breaks |
| Traditional tiled look | Concrete-style finish |
| Hard-to-update design | Contemporary appearance |
The goal is not simply to paint over tile. A proper microcement overlay uses preparation layers, primers, reinforcement when required, finish coats, and a protective sealer.
Homeowners considering this renovation method can review a complete microcement over tile installation guide to understand what happens between the “before” and “after” stages.
How Much Does Microcement Over Tile Cost in Dallas?
Microcement over tile commonly falls within professional microcement installation pricing, but additional tile preparation can increase the total cost. In Dallas, published 2026 pricing for professional microcement floors is roughly $14 to $34 per square foot, depending on substrate requirements. (atria-usa.com)
A sound tiled surface that needs limited preparation may cost less than a floor with cracked grout, uneven tiles, weak adhesion, or significant leveling requirements.
Key pricing factors include:
- Total square footage
- Tile condition
- Number of grout joints
- Surface leveling
- Crack repairs
- Primer requirements
- Reinforcement mesh
- Waterproofing
- Number of corners and edges
- Selected color and texture
- Sealer system
- Labor complexity
For broader budgeting, the microcement flooring cost in Dallas explains how substrate condition and project complexity affect professional installation prices.
How Is Microcement Applied Over Existing Tile?
Professional microcement installation over tile uses several preparation and finishing stages so the tile joints do not simply show through the new surface.
The exact system depends on the product and substrate, but a typical process follows these steps.
1. Inspect the Existing Tiles
The first step is confirming that the existing tile is suitable to remain in place.
Installers check for loose tiles, cracks, movement, moisture, hollow areas, and unstable grout. Covering a failed substrate with microcement does not repair the underlying failure.
2. Clean and Prepare the Surface
Tile must be clean and properly prepared so the next layers can bond correctly.
Grease, soap residue, dust, and other contaminants can interfere with adhesion. Bathrooms and kitchens often need extra cleaning before installation begins.
3. Fill Grout Joints and Level the Surface
Grout lines must be treated so the old tile pattern does not transfer through the finished microcement.
This stage is especially important when tiles have deep or wide joints. The goal is to create a more uniform base.
Correct microcement wall prep over tile is particularly important on vertical bathroom and shower surfaces.
4. Apply Primer and Reinforcement
The appropriate microcement primer creates a bonding layer between the prepared tile and the new system.
Some installations also require fiberglass mesh or other reinforcement. The product manufacturer and installer should determine the correct system for the substrate.
5. Apply Base and Finish Coats
Microcement is built in thin layers rather than poured over the tiles like conventional concrete.
Base layers help create stability and coverage. Finish coats produce the desired microcement finishes, color, texture, and trowel movement.
A professional microcement installation process should follow the requirements of the selected system rather than relying on one universal method.
6. Seal the Finished Surface
The final sealer protects the decorative surface against stains, moisture, and everyday use according to the system specification.
Bathrooms, kitchens, and floors require particular attention because they receive more water, cleaning, and physical wear than a decorative feature wall.
Can Microcement Go Over Bathroom Tiles?
Yes, microcement can often cover stable bathroom tiles and is commonly considered when homeowners want to renovate without complete tile demolition.
A microcement bathroom renovation can include bathroom walls, floors, vanity areas, and selected shower surfaces. The result can make an older tiled bathroom feel cleaner and more contemporary.
A micro cement bathroom can also use coordinated colors across several surfaces to create a more unified design.
Popular choices include:
- Warm beige microcement
- Soft white
- Light concrete gray
- Taupe
- Charcoal
- Natural sand tones
A beige microcement bathroom often creates a warmer appearance, while a white microcement bathroom can make a compact room feel brighter.
Can You Put Microcement Over Shower Tiles?
Microcement can be installed over suitable shower tiles, but waterproofing and substrate condition must be assessed before the decorative coating is applied.
A microcement shower over tile requires more technical care than a dry feature wall. Existing tile does not automatically prove that the shower’s underlying waterproofing is sound.
Waterproofing is a broader construction system designed to prevent water from passing into areas where it can cause damage. Overview of waterproofing provides useful background on this principle.
For a microcement over tile shower, installers should pay close attention to corners, penetrations, drains, transitions, existing movement, and the waterproofing system beneath the visible finish.
Can Microcement Be Applied Over Tile Floors?
Yes, microcement can be applied over a stable tile floor when the existing surface can support the new coating without excessive movement.
This method can be useful for kitchens, bathrooms, entryways, and living areas where removing a large tiled floor would create significant demolition.
However, a concrete over tile floor concept should not be confused with pouring a thick concrete slab over tile. Microcement is a much thinner decorative system.
You can compare its characteristics with microcement flooring when deciding whether an overlay is appropriate for your existing floor.
Is Microcement Over Tiles Better Than Removing Tiles?
Microcement over tiles can be a better option when the existing tile is stable because it can reduce demolition, but removal is safer when the tiled substrate is failing.
Here is a simple comparison:
| Factor | Microcement Over Tile | Remove and Replace Tile |
| Demolition | Usually limited | Significant |
| Debris | Less | More |
| Grout lines after completion | No traditional grout grid | Usually visible |
| Existing tile must be stable | Yes | No |
| Design | Seamless concrete look | Individual tile pattern |
| Preparation | Critical | New substrate preparation |
| Installation approach | Thin coating system | Tile installation |
Homeowners should base the decision on substrate condition rather than appearance alone.
What Are the Benefits of Microcement Over Existing Tiles?
The biggest advantage is transforming an existing tiled surface without automatically requiring complete demolition.
Other advantages include:
- Seamless appearance
- No conventional grout grid
- Thin application
- Wide range of colors
- Custom textures
- Reduced demolition in suitable projects
- Can work on walls and floors
- Suitable for modern bathroom designs
- Can coordinate with backsplashes and feature walls
- Creates visual continuity
For inspiration, these microcement bathroom ideas show how seamless surfaces can be incorporated into modern bathroom designs.
What Problems Can Occur When Microcement Is Applied Over Tiles?
Cracking, joint ghosting, adhesion failure, and moisture-related problems can occur when the existing tile or substrate is not properly assessed and prepared.
Common mistakes include:
- Applying over loose tiles
- Ignoring structural cracks
- Failing to treat grout lines
- Using the wrong primer
- Skipping required reinforcement
- Applying coats too quickly
- Ignoring moisture problems
- Using an unsuitable sealer
- Assuming microcement alone waterproofs a shower
Microcement is thin. Movement underneath the coating can affect the finished surface.
This is why professional microcement installation can be worth considering for floors, showers, and large tiled areas.
DIY Microcement or Professional Installation?
DIY microcement may be practical for experienced users on small, simple surfaces, but large floors, bathrooms, and showers are less forgiving of preparation errors.
A microcement kit may include base products, finish material, primer, pigments, or sealer. However, owning the products does not guarantee that the existing tile is suitable.
Professional installers can evaluate tile adhesion, grout joints, substrate movement, moisture, reinforcement, and finishing requirements before starting.
Homeowners comparing DIY experiences can also explore microcement for common questions and user experiences, but manufacturer specifications and professional technical advice should take priority for installation decisions.
How Do You Choose a Microcement Installer in Dallas?
Choose a Dallas installer who can explain exactly how the existing tiles will be assessed and prepared before discussing the final color or finish.
Ask potential contractors:
- Are my existing tiles suitable for microcement?
- How will you check for loose tiles?
- How will grout joints be treated?
- Is reinforcement required?
- Which primer will you use?
- How will cracks be handled?
- What waterproofing is required in my shower?
- Which sealer is included?
- How long will the project take?
- Can I see before-and-after tile overlay projects?
A detailed scope makes it easier to compare microcement contractors near me without choosing solely on the lowest price.
Frequently Asked Questions
Can you microcement over tiles?
Yes. Microcement can usually be applied over tiles when the existing surface is stable, firmly bonded, clean, and correctly prepared. Grout joints need treatment, and the installation may require primer, leveling products, or reinforcement. Loose tiles, structural movement, or moisture problems should be corrected before applying microcement.
Does microcement hide tile grout lines?
Yes, properly installed microcement should create a continuous finish that visually conceals the original grout grid. However, grout joints must be correctly filled and prepared before the finish layers are applied. Poor preparation can allow old tile patterns or joints to become visible through the new surface later.
How thick is microcement over tiles?
Microcement is normally only a few millimeters thick, although total system thickness varies by manufacturer and substrate requirements. Its thin profile makes it useful for renovations where homeowners want to cover stable tiles without adding the depth associated with a new concrete slab.
Is microcement cheaper than replacing tiles?
Sometimes. Microcement may reduce demolition and disposal costs because stable existing tiles can remain in place. However, extensive preparation, waterproofing, reinforcement, or repairs can increase the price. Compare complete installation quotes rather than comparing only the cost of microcement materials with the price of new tiles.
How long does microcement last over tiles?
A properly installed microcement system can provide many years of service when the tile substrate remains stable and the surface is maintained correctly. Longevity depends on preparation quality, substrate movement, installation, traffic, moisture exposure, sealer performance, and maintenance. An unstable tiled base can shorten the life of the finish.
Can you microcement over bathroom tiles without removing them?
Yes, suitable bathroom tiles can often be covered without full removal. The installer should first check adhesion, cracks, movement, moisture, grout condition, and waterproofing requirements. This makes microcement one option for homeowners researching how to cover bathroom tiles without removing them while creating a seamless appearance.
Can microcement go directly over shower tiles?
Microcement may be installed over existing shower tiles, but the shower must be assessed as a complete wet-area system. Stable tile alone is not enough. Waterproofing, drains, corners, penetrations, substrate movement, adhesion, and the correct protective system all need consideration before installation begins.
Conclusion
Microcement over tiles before and after can change a dated tiled surface into a seamless, modern finish without automatically requiring complete demolition. The method can work on bathroom walls, shower tiles, kitchen backsplashes, and floors when the existing substrate is stable.
The most important part of the transformation happens before the final microcement is visible. Tile adhesion, grout preparation, cracks, primer, reinforcement, waterproofing, and sealing all affect the finished result.
For Dallas homeowners considering an overlay, microscement recommends assessing the existing tile first and choosing the installation system based on substrate condition rather than appearance alone.